

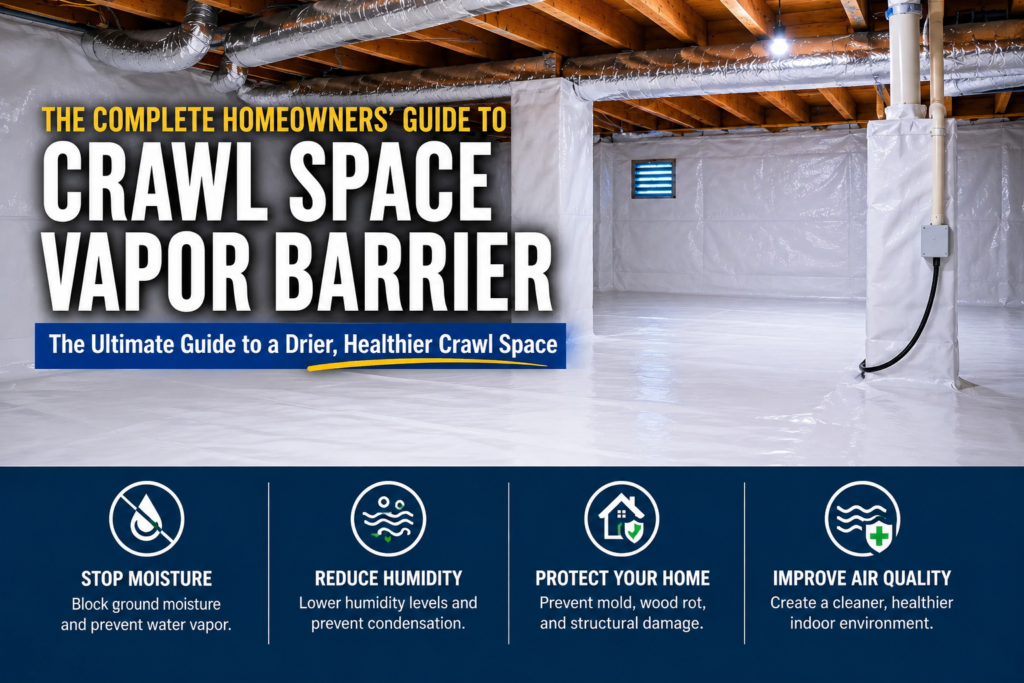
A practical guide to crawl space vapor barriers: how they work, when they are enough, material thickness, installation, costs, common mistakes, and when drainage, dehumidification, or full encapsulation may be needed.
Quick Answer
A crawl space vapor barrier is a polyethylene liner installed over exposed soil to reduce water vapor entering the crawl space from the ground. It can be an effective first step for controlling ground moisture, but it does not stop active flooding, plumbing leaks, groundwater intrusion, or every source of high humidity. Diagnose bulk-water problems first, then choose the barrier thickness, sealing method, and any additional drainage or humidity-control measures the crawl space actually needs.
Not Sure Whether a Vapor Barrier Is Enough?
Use the CrawlSpaceInfo Free Crawl Space Assessment to organize the water, humidity, mold, odor, insulation, pest, and structural symptoms you are seeing.
If you’ve looked beneath your home and seen exposed soil, damp conditions, or standing water, you’ve probably heard the term crawl space vapor barrier. It’s one of the most common recommendations homeowners receive to help control moisture, protect the structure of their home, and improve indoor air quality.
A vapor barrier is a durable sheet of polyethylene plastic installed over the exposed soil in a crawl space. Its primary purpose is to reduce the amount of water vapor that naturally evaporates from the ground into the air beneath your home. By controlling ground moisture, a vapor barrier can help reduce humidity, discourage mold growth, protect wooden framing, and create a healthier environment throughout the house.
While a vapor barrier is an important moisture-control solution, it isn’t always the complete answer. Some crawl spaces require additional drainage, dehumidification, or full encapsulation depending on the severity of the moisture problem. Understanding the differences can save homeowners thousands of dollars while ensuring the right solution is chosen.
In this guide, you’ll learn:
- What a crawl space vapor barrier is
- How it works
- The benefits and limitations
- Recommended material thicknesses
- DIY installation steps
- Typical installation costs
- When a vapor barrier is enough—and when full encapsulation is the better investment
Whether you’re researching a DIY project or comparing professional estimates, this guide will help you make an informed decision.
What Is a Crawl Space Vapor Barrier?
A crawl space vapor barrier is a continuous sheet of heavy-duty polyethylene plastic installed across the exposed soil in a crawl space. Its purpose is to slow the movement of moisture vapor from the ground into the air beneath your home.
Even dry-looking soil continuously releases moisture. As that moisture evaporates, it increases humidity inside the crawl space. Over time, elevated humidity can contribute to:
- Mold and mildew growth
- Wood rot
- Rust and corrosion
- Musty odors
- Higher indoor humidity
- Reduced energy efficiency
A properly installed vapor barrier acts as a moisture shield between the earth and the crawl space air. Instead of allowing water vapor to freely rise into the space, the plastic liner blocks most of that moisture, helping create a drier and healthier environment.
Unlike a full crawl space encapsulation system, a basic vapor barrier typically covers only the crawl space floor. Full encapsulation also seals foundation walls, vents, gaps, and penetrations while often adding a dedicated dehumidifier for complete moisture control.
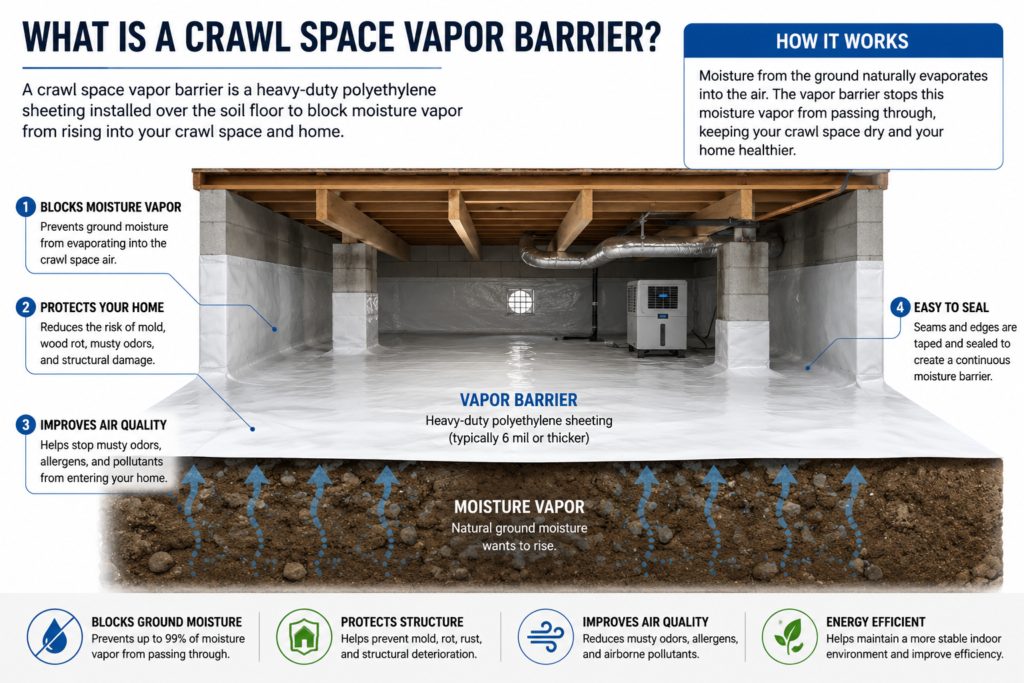
A quality vapor barrier should:
- Cover all exposed soil
- Overlap seams by at least 12 inches
- Be sealed with vapor barrier tape
- Extend partially up foundation walls
- Be securely fastened to prevent movement
When installed correctly, a vapor barrier forms the foundation of an effective crawl space moisture-control strategy.
How a Vapor Barrier Works
Moisture is constantly moving through the ground beneath your home. Even when the soil appears dry, water within it slowly evaporates into the air. Without a vapor barrier, this moisture accumulates inside the crawl space, increasing relative humidity and creating ideal conditions for mold, mildew, pests, and wood decay.
A crawl space vapor barrier interrupts this process by creating a physical barrier between the soil and the crawl space air.
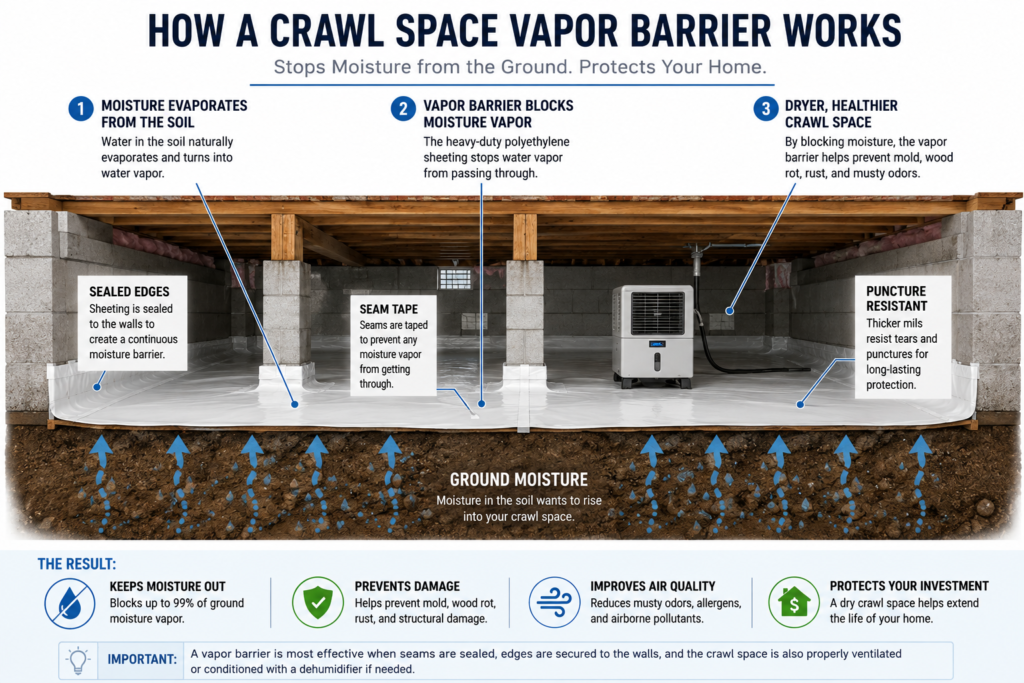
The process works like this:
- Moisture naturally evaporates from the soil.
- The polyethylene vapor barrier blocks most of that moisture from entering the crawl space.
- Relative humidity remains significantly lower.
- Structural wood stays drier.
- Mold growth becomes much less likely.
- Indoor air quality can improve because less damp air enters the home through the stack effect.
While no vapor barrier can stop every source of moisture, it dramatically reduces one of the largest contributors: continuous ground evaporation.
Why Crawl Spaces Become Wet
Many homeowners assume that water only enters a crawl space after heavy rain or flooding. In reality, moisture can enter from several different sources, and even a crawl space that has never flooded may have chronic humidity problems.
Understanding where moisture comes from is the first step toward choosing the right solution.
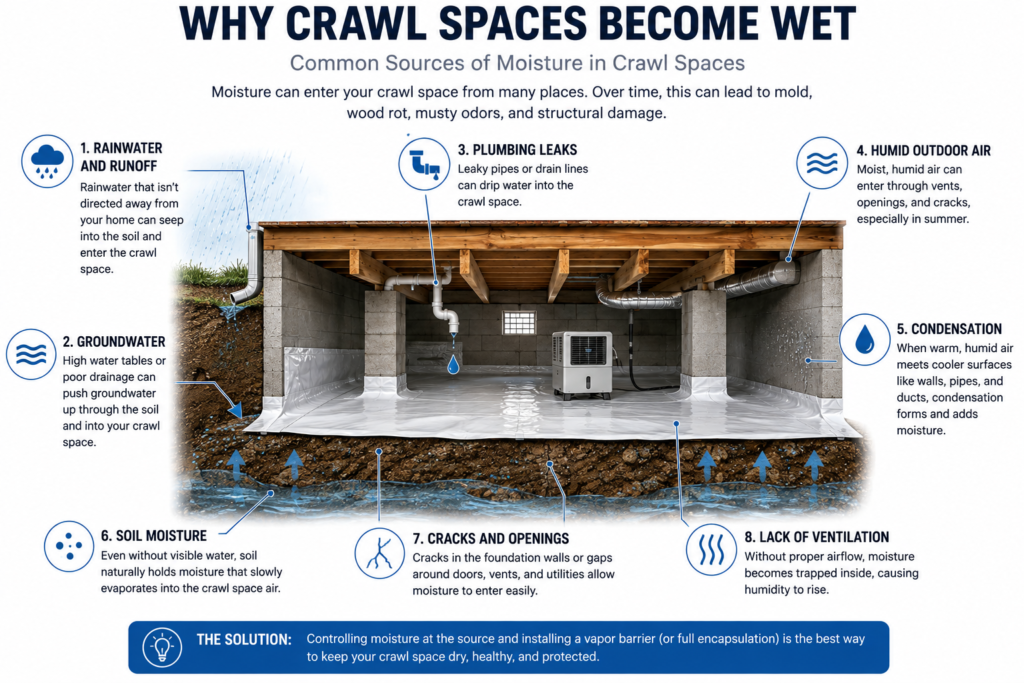
1. Ground Moisture
The largest source of moisture is often the soil itself.
The ground beneath your home constantly releases water vapor. Even if the soil appears dry, moisture naturally evaporates into the crawl space every day. Without a vapor barrier, this moisture accumulates, raising humidity levels and creating ideal conditions for mold and wood decay.
2. Rainwater Intrusion
Rainwater can enter a crawl space when drainage around the home is inadequate.
Common causes include:
- Clogged gutters
- Short or disconnected downspouts
- Poor yard grading
- Foundation drainage problems
- Heavy storms
Once water enters the crawl space, it may take weeks or even months to dry naturally.
3. High Outdoor Humidity
In many parts of the United States, especially the Southeast, outdoor air is extremely humid during the warmer months.
When humid air enters a vented crawl space, it often contacts cooler framing and ductwork. As warm, moist air cools, condensation forms on these surfaces.
This process can leave wood framing damp even when there is no standing water.
4. Plumbing Leaks
Even a small plumbing leak can introduce a significant amount of moisture over time.
Leaks may come from:
- Water supply pipes
- Drain pipes
- HVAC condensate lines
- Water heaters
- Washing machine plumbing
Because crawl spaces are rarely inspected, these leaks often go unnoticed until mold or structural damage has already developed.
5. Poor Drainage Around the Foundation
Water should always flow away from your home.
If the soil slopes toward the foundation instead of away from it, rainwater collects around the crawl space walls and can seep underneath the house.
Signs of poor drainage include:
- Standing water after rain
- Muddy soil near the foundation
- Water stains on foundation walls
- Persistent dampness
6. Flooding and High Groundwater
Homes located in low-lying areas or regions with high groundwater tables may experience recurring crawl space flooding.
In these situations, a vapor barrier alone is usually not enough. Additional waterproofing measures—such as French drains, sump pumps, or full encapsulation—may be required.
Why Identifying the Moisture Source Matters
Not every crawl space needs the same solution.
For example:
- Ground moisture only: A properly installed vapor barrier may provide sufficient protection.
- Standing water: Drainage improvements should be completed before installing a vapor barrier.
- High humidity: A dehumidifier may be needed alongside a vapor barrier.
- Multiple moisture sources: Full crawl space encapsulation is often the most effective long-term solution.
Treating the symptom without addressing the underlying cause can allow moisture problems to return, even after a new vapor barrier has been installed.
Not sure what is causing the moisture beneath your home?
Take our Free Crawl Space Assessment to identify likely moisture sources and see whether a vapor barrier, drainage improvement, dehumidifier, or professional evaluation may be appropriate.
👉 Start Your Free Crawl Space Assessment
Vapor Barrier vs. Crawl Space Encapsulation
One of the most common questions homeowners ask is:
“Do I just need a vapor barrier, or should I fully encapsulate my crawl space?”
The answer depends on the condition of your crawl space, your home’s moisture levels, and your long-term goals.
While both solutions are designed to reduce moisture, they offer different levels of protection.
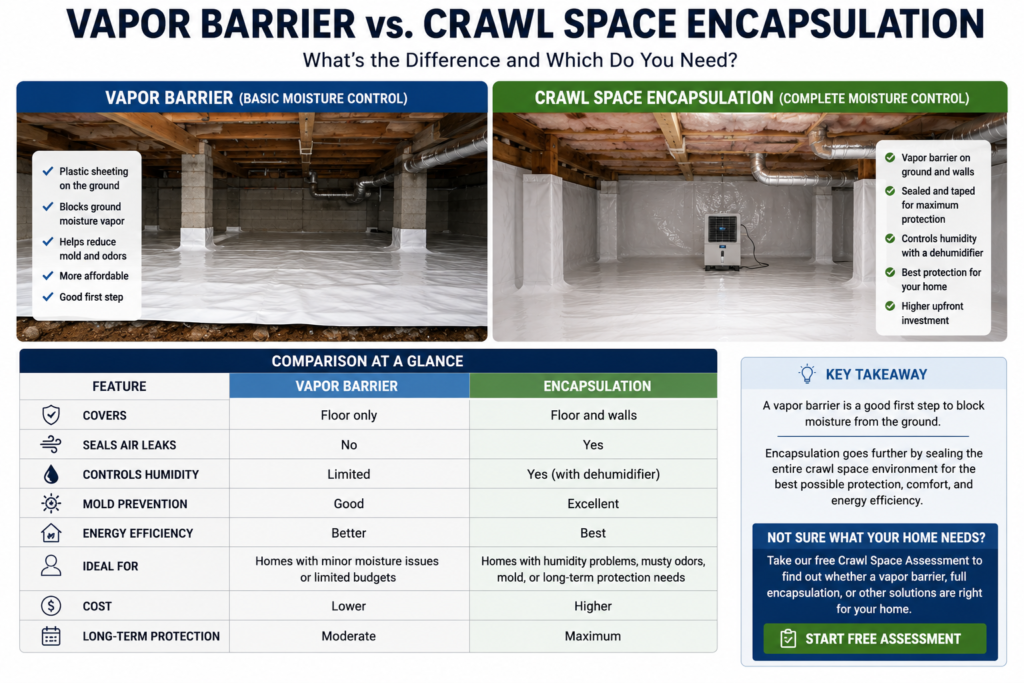
What a Vapor Barrier Does
A crawl space vapor barrier is installed directly over the exposed soil.
Its primary purpose is to reduce the amount of moisture evaporating from the ground into the crawl space air.
A basic vapor barrier installation typically includes:
- Heavy-duty polyethylene plastic covering the soil
- Overlapping seams
- Vapor barrier tape
- Partial attachment to foundation walls
A vapor barrier is an excellent first step for crawl spaces that have minimal moisture problems and no standing water.
What Crawl Space Encapsulation Does
Encapsulation is a complete moisture-management system.
Instead of only covering the ground, encapsulation seals the entire crawl space from outside moisture and humid air.
A typical encapsulation system includes:
- Heavy-duty vapor barrier on the floor
- Vapor barrier sealed to foundation walls
- Wrapped support piers
- Sealed crawl space vents
- Air leak sealing
- Crawl space dehumidifier
- Optional drainage system or sump pump
The goal is to create a clean, dry, conditioned environment beneath your home.
Side-by-Side Comparison
| Feature | Vapor Barrier | Full Encapsulation |
|---|---|---|
| Covers exposed soil | ✅ | ✅ |
| Seals foundation walls | ❌ | ✅ |
| Seals crawl space vents | ❌ | ✅ |
| Controls ground moisture | ✅ | ✅ |
| Controls humid outside air | ❌ | ✅ |
| Includes dehumidifier | Optional | Usually |
| Provides maximum mold protection | Moderate | Excellent |
| Improves energy efficiency | Moderate | High |
| Typical cost | Lower | Higher |
When a Vapor Barrier Is Usually Enough
A vapor barrier may be the right solution if:
- Your crawl space is generally dry.
- Moisture comes primarily from the soil.
- There is no standing water.
- Humidity levels remain relatively low.
- You want an affordable moisture-control upgrade.
- Mold and structural damage are not present.
Many homeowners successfully reduce humidity by installing a properly sealed vapor barrier combined with improved drainage around the home.
When Full Encapsulation Is the Better Choice
Encapsulation is often recommended when your crawl space has ongoing moisture problems or signs of structural deterioration.
Consider full encapsulation if you notice:
- Standing water
- Frequent condensation
- Mold growth
- Wood rot
- Rusted metal supports
- High humidity (above 60%)
- Musty odors inside the home
- Pest infestations
- High radon levels
- Poor indoor air quality
In these situations, simply covering the ground may not address all the sources of moisture entering the crawl space.
Which Option Provides the Best Long-Term Value?
For many homeowners, a vapor barrier is a cost-effective way to reduce moisture and protect the crawl space.
However, if your crawl space experiences recurring humidity, water intrusion, or mold problems, investing in full encapsulation can provide greater long-term protection by addressing moisture from multiple sources rather than just the soil.
If you’re unsure which solution is appropriate, a professional inspection or moisture assessment can help identify the underlying cause before you invest in repairs.
Not sure whether a vapor barrier is enough?
Use our Free Crawl Space Assessment to compare your symptoms with common moisture risks and learn whether basic ground coverage or full encapsulation may be the better fit.
👉 Start Your Free Crawl Space Assessment
Benefits of Installing a Crawl Space Vapor Barrier
A properly installed vapor barrier offers more than just cleaner-looking plastic on the ground. By reducing moisture beneath your home, it helps protect the structure, improve indoor comfort, and reduce the risk of costly repairs.
The following benefits explain why a vapor barrier is one of the most effective first steps in crawl space moisture control.
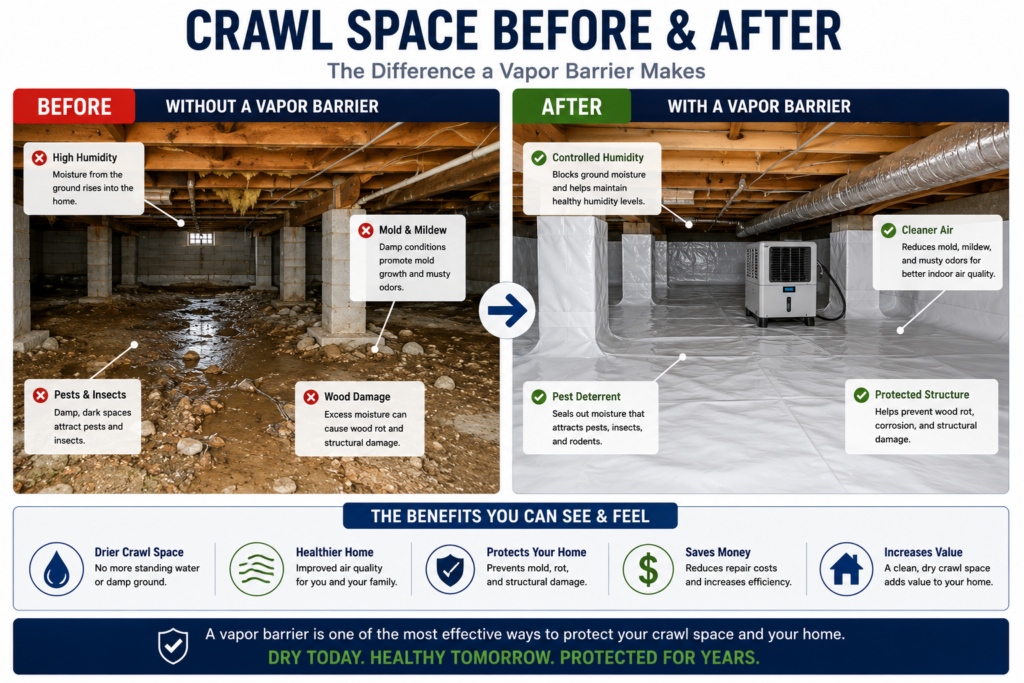
Controls Ground Moisture
The primary purpose of a vapor barrier is to reduce the amount of moisture evaporating from the soil.
Without protection, exposed earth continuously releases water vapor into the crawl space. Over time, this moisture increases humidity and creates conditions that encourage mold, wood decay, and condensation.
By covering the soil with a properly sealed polyethylene liner, a vapor barrier significantly reduces one of the largest sources of crawl space humidity.
Helps Reduce Mold Growth
Mold requires three things to grow:
- Moisture
- Organic material (such as wood)
- Moderate temperatures
A crawl space naturally provides all three.
Although a vapor barrier doesn’t eliminate every source of moisture, it removes one of the most significant contributors—ground evaporation. Lower humidity makes it much more difficult for mold colonies to develop and spread.
Reducing mold beneath the home can also help minimize musty odors that migrate into the living space.
Protects Floor Joists and Structural Wood
Excess moisture doesn’t only affect the air—it also affects the wooden structure supporting your home.
Long-term exposure to high humidity can cause:
- Wood rot
- Fungal decay
- Warped framing
- Weakened floor joists
- Sagging floors
Keeping the crawl space drier helps preserve these structural components and may extend the lifespan of your home’s foundation system.
Improves Indoor Air Quality
Many homeowners don’t realize that the crawl space and living area are closely connected.
Because of the Stack Effect, warm air naturally rises through the house. As it does, it pulls replacement air upward from the crawl space.
If that crawl space contains excessive moisture, mold spores, dust, or unpleasant odors, some of those contaminants may enter the living areas above.
Reducing crawl space humidity helps create cleaner air throughout the home.
Helps Lower Energy Costs
Moist air is more difficult to heat and cool than dry air.
When humidity levels remain high beneath your home, your HVAC system often has to work harder to maintain comfortable indoor conditions.
A vapor barrier can help:
- Reduce excess humidity
- Improve insulation performance
- Lower HVAC workload
- Increase overall energy efficiency
While every home is different, many homeowners notice improved comfort after controlling crawl space moisture.
Discourages Pest Activity
Many insects and rodents prefer damp, humid environments.
By keeping the crawl space drier, a vapor barrier may help make the area less attractive to:
- Termites
- Carpenter ants
- Cockroaches
- Silverfish
- Rodents
While a vapor barrier isn’t a pest-control system, moisture reduction often complements professional pest prevention strategies.
Creates a Cleaner Crawl Space
Anyone who has crawled beneath a house knows how messy an exposed dirt floor can become.
A vapor barrier creates a clean working surface for:
- Plumbing repairs
- Electrical work
- HVAC maintenance
- Home inspections
- Future upgrades
Professionals often appreciate working in a crawl space that has been properly lined because it reduces dirt, mud, and standing moisture.
Increases Long-Term Home Value
A clean, dry crawl space is viewed positively by both home inspectors and prospective buyers.
Moisture-related issues discovered during a real estate transaction can delay a sale or lead to costly repair negotiations.
Installing a quality vapor barrier demonstrates proactive maintenance and may help preserve your home’s value over time.
Is a Vapor Barrier Worth the Investment?
For many homeowners, the answer is yes.
Compared to repairing mold damage, replacing rotted framing, or addressing foundation problems, installing a vapor barrier is often a relatively affordable preventative measure.
However, it’s important to remember that a vapor barrier is only one part of an effective moisture-management strategy. If water intrusion, flooding, or high humidity already exist, those problems should be corrected before—or alongside—installation.
Vapor Barrier Thickness Guide
Not all crawl space vapor barriers are the same.
One of the biggest differences between products is material thickness, which is measured in mils (one-thousandth of an inch).
A thicker vapor barrier generally offers:
- Greater durability
- Better puncture resistance
- Longer service life
- Improved protection in crawl spaces that receive regular foot traffic
However, thicker isn’t always necessary. The right choice depends on your crawl space conditions, your budget, and whether you’re installing a simple ground cover or a complete encapsulation system.
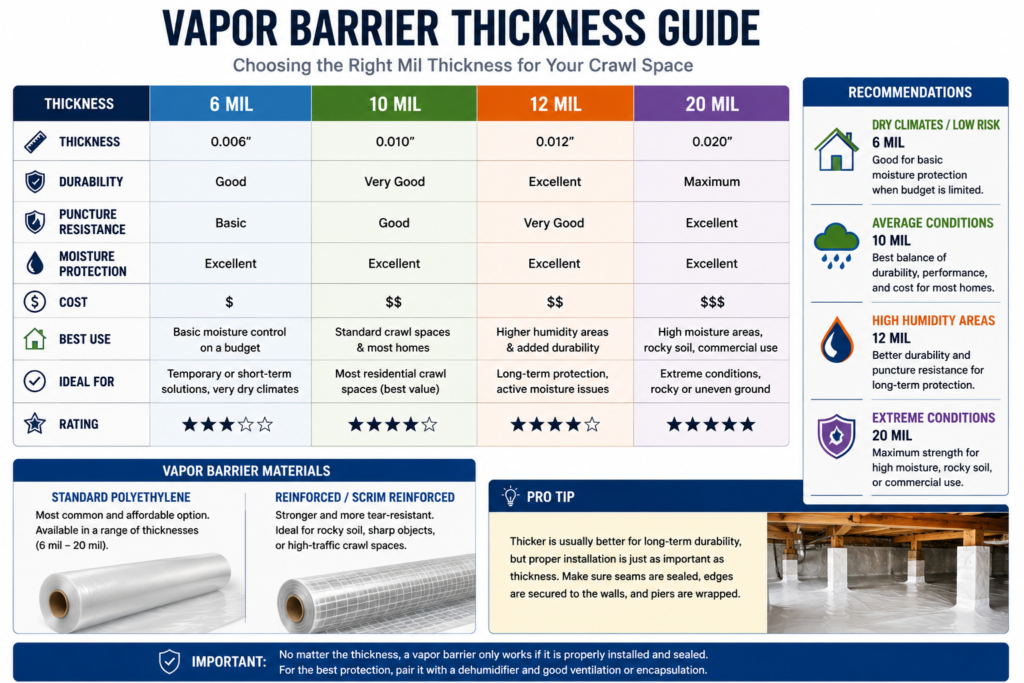
Understanding “Mil”
A mil is 0.001 inch thick.
For example:
- 6 mil = 0.006 inches
- 10 mil = 0.010 inches
- 12 mil = 0.012 inches
- 20 mil = 0.020 inches
Although these differences seem small, they have a significant impact on strength and durability.
6 Mil Vapor Barrier
A 6 mil polyethylene sheet is the most basic vapor barrier available.
Best For
- Dry crawl spaces
- Temporary installations
- Budget-conscious homeowners
- Light-duty applications
Advantages
- Lowest cost
- Easy to install
- Readily available
- Suitable for basic moisture control
Disadvantages
- Tears easily
- Limited puncture resistance
- Shorter lifespan
- Not ideal for frequent crawl space access
For many homeowners, 6 mil plastic is a starting point—but not the best long-term investment.
10 Mil Vapor Barrier
A 10 mil liner provides noticeably greater durability while remaining affordable.
Best For
- Average residential crawl spaces
- Moderate humidity
- Homeowners wanting improved longevity
Advantages
- Better puncture resistance
- Longer lifespan
- Easier to walk on
- Improved seam strength
Many professionals consider 10 mil the minimum thickness for a long-lasting residential installation.
12 Mil Vapor Barrier
A 12 mil vapor barrier offers an excellent balance between cost and durability.
Best For
- Homes with moderate to high humidity
- Long-term moisture protection
- DIY encapsulation projects
Advantages
- Stronger than 10 mil
- Better resistance to tears
- Handles occasional maintenance traffic well
- Longer service life
This thickness is popular among professional installers because it combines durability with reasonable material costs.
20 Mil Vapor Barrier
Twenty mil reinforced liners represent the premium end of crawl space moisture control.
Best For
- Full crawl space encapsulation
- High-moisture environments
- Homes requiring maximum durability
- Commercial applications
Advantages
- Exceptional puncture resistance
- Long service life
- Highly durable
- Ideal for maintenance access
- Professional appearance
Although more expensive initially, many homeowners view 20 mil liners as a long-term investment that may last for decades when properly installed.
Standard Polyethylene vs. Reinforced Vapor Barriers
Thickness is only one factor.
Many premium vapor barriers also use reinforced polyethylene, which incorporates a woven internal mesh to improve strength.
Standard Polyethylene
- Lower cost
- Flexible
- Easy to install
- Suitable for most residential applications
Reinforced Polyethylene
- Extremely durable
- Better tear resistance
- Handles foot traffic more effectively
- Preferred for encapsulation systems
If your crawl space requires frequent access for plumbing or HVAC maintenance, reinforced material is often worth the additional cost.
Which Thickness Should You Choose?
Here’s a general guideline:
| Crawl Space Condition | Recommended Thickness |
|---|---|
| Dry crawl space | 6 mil |
| Average residential home | 10 mil |
| Humid crawl space | 12 mil |
| Full encapsulation | 20 mil reinforced |
| Heavy maintenance traffic | 20 mil reinforced |
Our Recommendation
For most homeowners planning a long-term solution, 10 mil to 12 mil offers the best balance between durability, performance, and cost.
If you’re investing in a complete crawl space encapsulation system, a 20 mil reinforced liner is typically the better choice because it withstands years of maintenance activity while providing maximum protection.
Remember that even the thickest vapor barrier cannot compensate for poor installation. Proper seam sealing, wall attachment, drainage correction, and moisture management are just as important as the material itself.
Vapor Barrier Materials
Choosing the right material is just as important as choosing the correct thickness.
While most homeowners refer to every ground liner as a “vapor barrier,” not all products are manufactured to the same standards. Differences in material quality, reinforcement, UV resistance, and installation accessories can significantly affect long-term performance.
Understanding these differences will help you purchase the right system for your crawl space.
Polyethylene Vapor Barriers
The vast majority of residential crawl space vapor barriers are made from polyethylene, a durable plastic specifically designed to resist moisture transmission.
Polyethylene is popular because it is:
- Waterproof
- Flexible
- Lightweight
- Durable
- Easy to clean
- Resistant to mold and mildew
It is available in several thicknesses, making it suitable for everything from basic DIY projects to professional encapsulation systems.
Reinforced Polyethylene
Premium vapor barriers often include an internal reinforcement layer.
Instead of relying on plastic alone, reinforced liners contain a woven mesh sandwiched between layers of polyethylene.
This provides several advantages:
- Higher tear resistance
- Better puncture protection
- Improved dimensional stability
- Longer service life
- Greater durability during maintenance
Although reinforced liners cost more, they are generally recommended for crawl spaces that require regular access.
Virgin vs. Recycled Plastic
Not all polyethylene is created equally.
Virgin Polyethylene
Manufactured from new plastic resin.
Advantages include:
- Consistent thickness
- Higher strength
- Better flexibility
- Longer lifespan
- Fewer manufacturing imperfections
Recycled Polyethylene
Manufactured using recycled plastic materials.
Advantages:
- Lower cost
- Environmentally friendly
- Suitable for basic installations
Disadvantages:
- May contain inconsistencies
- Lower tear resistance
- Can become brittle over time
For long-term moisture protection, many professionals recommend virgin polyethylene products.
White vs. Black Vapor Barriers
Homeowners often wonder whether color matters.
It does—but mostly for practical reasons.
White Vapor Barriers
Advantages:
- Reflect more light
- Brighten the crawl space
- Easier to inspect
- Makes leaks easier to identify
- Preferred for encapsulation systems
Many professional installers choose white liners because they create a cleaner, brighter working environment.
Black Vapor Barriers
Advantages:
- Usually less expensive
- Helps hide dirt
- Blocks light effectively
Although black liners perform well, they can make inspections more difficult because the crawl space remains darker.
Antimicrobial Vapor Barriers
Some premium products include antimicrobial additives designed to resist surface mold growth on the liner itself.
It’s important to understand what these coatings do—and what they don’t do.
They may:
- Reduce mold growth on the plastic surface
- Help maintain a cleaner appearance
They do not:
- Kill existing mold
- Prevent mold growing on wood
- Eliminate moisture problems
The best mold prevention strategy is still moisture control.
Vapor Barrier Seam Tape
A vapor barrier is only as good as its seams.
Every overlap should be sealed using high-quality vapor barrier tape specifically designed for polyethylene liners.
Proper seam sealing:
- Prevents moisture from escaping between sheets
- Improves durability
- Creates a more continuous moisture barrier
Using ordinary household duct tape is not recommended because it often fails in humid crawl space conditions.
Foundation Wall Fasteners
Professional installations extend the vapor barrier partially up the foundation walls.
To keep the liner securely attached, installers commonly use:
- Mechanical fasteners
- Masonry anchors
- Plastic fasteners
- Adhesive sealants
- Termination bars
These components help prevent the liner from pulling away over time.
Termination Bars
Termination bars are rigid strips installed along the top edge of the vapor barrier where it meets the foundation wall.
Their purpose is to:
- Secure the liner
- Improve appearance
- Reduce the chance of separation
- Create a cleaner professional installation
Although not always required for simple DIY ground covers, they are commonly used in professional encapsulation systems.
Recommended Material Combinations
Different crawl spaces require different levels of protection.
Basic Moisture Control
- 6–10 mil polyethylene
- Vapor barrier tape
- Ground coverage only
Suitable for dry crawl spaces with minimal humidity.
Long-Term Residential Protection
- 10–12 mil virgin polyethylene
- Professional seam tape
- Wall attachment
- Foundation fasteners
A good choice for homeowners seeking long-term moisture control.
Premium Encapsulation System
- 20 mil reinforced polyethylene
- Sealed seams
- Wall attachment
- Termination bars
- Wrapped support piers
- Crawl space dehumidifier
Recommended for homes with chronic humidity, mold concerns, or full encapsulation projects.
Our Recommendation
For most homeowners, a 10–12 mil virgin polyethylene vapor barrier, combined with high-quality seam tape and proper installation techniques, offers the best balance of performance, durability, and value.
If you’re planning a complete crawl space encapsulation or expect frequent maintenance access, upgrading to a 20 mil reinforced liner is often a worthwhile long-term investment.
Remember, even the highest-quality materials won’t perform well if they’re installed over standing water, poorly sealed, or used without correcting underlying drainage issues.
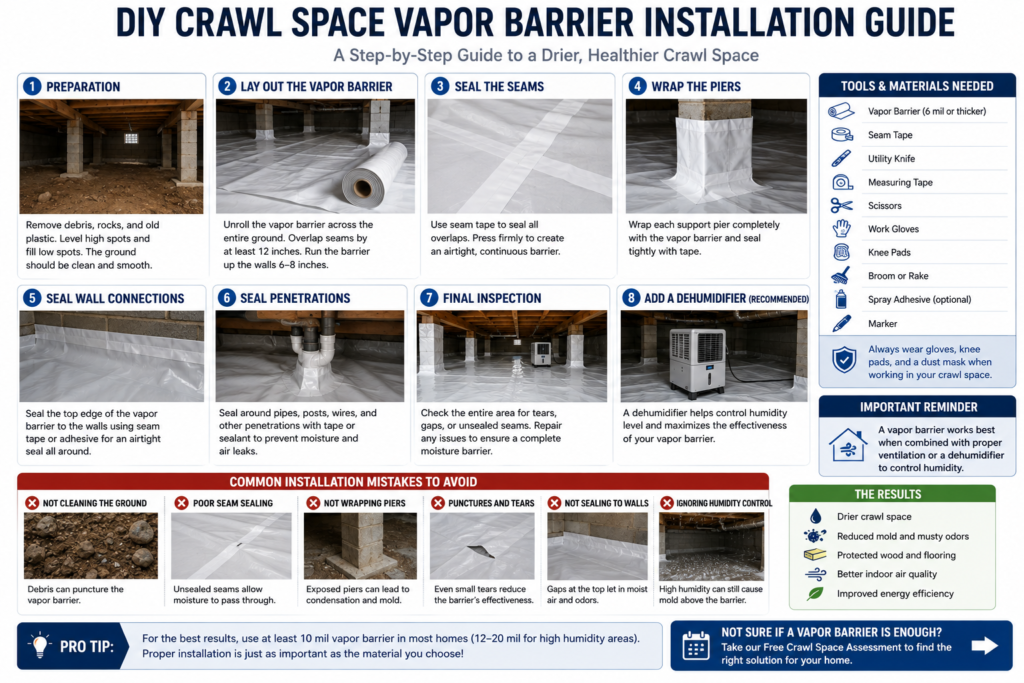
DIY Crawl Space Vapor Barrier Installation Guide
Installing a crawl space vapor barrier is a project that many homeowners can complete themselves, provided the crawl space is dry, accessible, and free of major structural or water problems.
However, success depends on careful preparation. Simply rolling plastic across the dirt floor without sealing seams or addressing moisture issues will not provide long-term protection.
The following step-by-step guide outlines the basic installation process.
Before You Begin
Inspect the crawl space carefully before purchasing materials.
Look for:
- Standing water
- Plumbing leaks
- Foundation cracks
- Mold growth
- Wood rot
- Pest activity
- Loose insulation
- Damaged floor joists
If you discover significant water intrusion or structural damage, correct those problems first. Installing a vapor barrier over existing moisture issues can trap water and allow problems to worsen.
Tools and Materials
Gather everything before entering the crawl space.
Materials
- Polyethylene vapor barrier
- Vapor barrier seam tape
- Construction tape
- Foundation fasteners (if attaching to walls)
- Termination bars (optional)
- Utility knife
- Measuring tape
Safety Equipment
- Disposable coveralls
- Knee pads
- Gloves
- Safety glasses
- N95 respirator (or better)
- Headlamp or work light
Working in confined spaces can be physically demanding. Always ensure adequate lighting and ventilation.
Step 1 – Prepare the Crawl Space
Before laying any plastic, clean the area thoroughly.
Remove:
- Rocks
- Construction debris
- Sharp objects
- Old plastic sheeting
- Fallen insulation
- Organic debris
A smooth surface helps prevent punctures and allows the vapor barrier to lie flat.
If necessary, lightly level the soil to eliminate sharp high spots.
Step 2 – Repair Moisture Problems
A vapor barrier should never be used to hide existing problems.
Repair:
- Plumbing leaks
- Drainage issues
- Downspout problems
- Standing water
- Foundation drainage concerns
If water regularly enters the crawl space after heavy rain, consider installing drainage improvements before laying the vapor barrier.
Step 3 – Measure the Crawl Space
Measure the length and width of the crawl space.
Add extra material for:
- Overlapping seams
- Wrapping around support piers
- Extending up foundation walls
Purchasing slightly more material than required usually makes installation easier.
Step 4 – Lay the Vapor Barrier
Starting at one corner, carefully roll the vapor barrier across the crawl space floor.
Avoid stretching the material tightly.
Instead, allow it to rest naturally against the soil while minimizing wrinkles.
Continue until all exposed soil is covered.
Step 5 – Overlap and Seal the Seams
Where two sheets meet:
- Overlap by at least 12 inches
- Seal every seam using vapor barrier tape
- Press the tape firmly to ensure good adhesion
Proper seam sealing prevents moisture from escaping between sections of plastic.
This is one of the most important parts of the installation.
Step 6 – Extend the Barrier Up the Walls
For improved moisture control, extend the vapor barrier several inches up the foundation walls.
Secure it using:
- Masonry fasteners
- Construction adhesive
- Mechanical anchors
- Termination bars (optional)
Wall attachment helps create a more continuous moisture barrier and reduces the chance of movement over time.
Step 7 – Wrap Around Support Piers
If the crawl space contains concrete or masonry support piers, carefully cut and wrap the vapor barrier around each one.
Seal all joints with vapor barrier tape.
This helps eliminate gaps where ground moisture could escape.
Step 8 – Final Inspection
Before leaving the crawl space, inspect the installation carefully.
Check for:
- Tears
- Loose seams
- Gaps around piers
- Exposed soil
- Poor wall attachment
- Missing tape
Repair any issues immediately while the materials are still accessible.
Common DIY Mistakes
Many vapor barrier failures result from installation errors rather than poor materials.
Avoid these common mistakes:
- Installing over standing water
- Leaving exposed soil uncovered
- Using plastic that is too thin
- Failing to seal seams
- Not overlapping sheets correctly
- Ignoring plumbing leaks
- Forgetting to extend the liner up foundation walls
- Walking on the liner with sharp tools or boots
- Using ordinary duct tape instead of vapor barrier tape
Taking extra time during installation usually results in a much longer-lasting system.
When Should You Hire a Professional?
DIY installation is often suitable when:
- The crawl space is dry.
- There is good access.
- No structural damage is present.
- You are comfortable working in confined spaces.
Professional installation is usually recommended when:
- Standing water is present.
- Mold covers large areas.
- Floor joists show signs of rot.
- Drainage systems need to be installed.
- Full crawl space encapsulation is planned.
- The crawl space has limited access or difficult working conditions.
A professional can also identify moisture problems that may not be obvious during a basic inspection.
DIY or Professional?
Installing a vapor barrier yourself can save money, but only if it is done correctly. A poorly installed vapor barrier may provide little long-term benefit and could require costly repairs later.
If you’re uncertain whether your crawl space only needs a vapor barrier—or whether a more comprehensive moisture-control solution is appropriate—consider completing a thorough crawl space assessment before beginning the project.
Common Vapor Barrier Installation Mistakes
Even the highest-quality vapor barrier can fail if it isn’t installed correctly.
Many crawl space moisture problems occur not because homeowners chose the wrong product, but because important installation steps were skipped. Fortunately, most of these mistakes are easy to avoid with proper planning.
Installing Over Standing Water
One of the biggest mistakes is covering a wet crawl space without first addressing the source of the water.
A vapor barrier is designed to control water vapor, not stop active flooding or standing water.
If water regularly collects beneath your home, identify and correct the cause before installing the barrier. This may involve:
- Improving exterior drainage
- Extending downspouts
- Regrading the landscape
- Installing a French drain
- Adding a sump pump
Failing to solve these issues first can trap moisture and reduce the effectiveness of the installation.
Choosing Plastic That Is Too Thin
Thin plastic may save money initially, but it is much more likely to tear during installation or routine maintenance.
Low-quality barriers can become punctured by:
- Rocks
- Construction debris
- Sharp tools
- Crawling across the surface
- HVAC or plumbing work
For long-term durability, many professionals recommend at least a 10 mil liner, with 12 mil or 20 mil reinforced material for higher-moisture environments or encapsulation systems.
Leaving Exposed Soil
Every section of exposed soil continues releasing moisture into the crawl space.
Even small uncovered areas can reduce the effectiveness of the entire vapor barrier system.
Make sure the liner completely covers:
- Open soil
- Corners
- Foundation edges
- Around support piers
- Tight crawl space sections
The goal is to create one continuous moisture barrier.
Failing to Seal Seams
Simply overlapping two sheets of plastic is not enough.
Every seam should be securely sealed using vapor barrier tape designed for polyethylene materials.
Poorly sealed seams allow moisture to escape between sections and weaken the overall system.
Ignoring Foundation Walls
Some DIY installations stop the plastic at the edge of the crawl space floor.
While this is better than leaving exposed soil, extending the liner several inches up the foundation walls creates a more complete moisture barrier and helps prevent the liner from shifting over time.
Professional installations typically attach the liner to the wall using fasteners or termination bars.
Installing Over Mold or Damaged Wood
A vapor barrier should never be used to hide existing damage.
If you notice:
- Mold growth
- Soft wood
- Wood rot
- Insect damage
- Structural deterioration
address those problems before installing the vapor barrier.
Covering damaged materials does not stop the underlying issue from progressing.
Using the Wrong Tape
Household duct tape is not designed for crawl space conditions.
Humidity, temperature changes, and dust often cause it to fail within a short period.
Instead, use tape specifically manufactured for crawl space vapor barriers to ensure long-lasting seam adhesion.
Forgetting Future Access
Remember that plumbers, electricians, HVAC technicians, and pest control professionals may need to enter the crawl space in the future.
When planning your installation:
- Avoid creating unnecessary obstacles.
- Leave service access where appropriate.
- Protect high-traffic areas with thicker material if needed.
A well-planned installation is easier to maintain over the life of the home.
Skipping Routine Inspections
Installing a vapor barrier is not a “set it and forget it” project.
Inspect your crawl space at least once or twice each year for:
- Tears
- Loose seams
- Water intrusion
- Pest activity
- Condensation
- Plumbing leaks
Early detection can prevent minor issues from becoming expensive repairs.
Avoiding These Mistakes Saves Money
Most vapor barrier problems are preventable.
Taking the time to prepare the crawl space, use quality materials, and follow proper installation techniques can significantly improve the performance and lifespan of your vapor barrier.
If your crawl space has ongoing water intrusion, persistent mold, or structural concerns, it may be more cost-effective to invest in a comprehensive moisture-control solution rather than repeatedly replacing damaged plastic.
Vapor Barrier Costs
Understanding the cost of installing a crawl space vapor barrier can help you decide whether to tackle the project yourself or hire a professional.
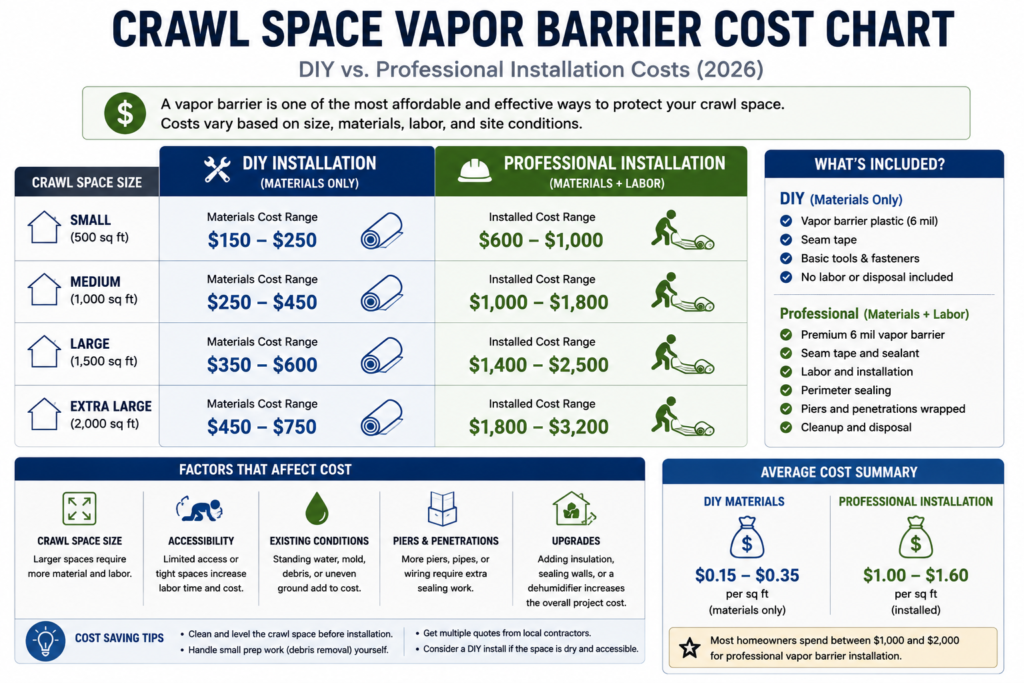
The total cost depends on several factors, including the size of your crawl space, the thickness of the material you choose, accessibility, and whether additional repairs or moisture-control measures are needed.
Average DIY Costs
Homeowners who install a vapor barrier themselves typically pay only for materials and tools.
Typical DIY expenses include:
| Item | Estimated Cost |
|---|---|
| 6 mil vapor barrier | $150–$350 |
| 10–12 mil vapor barrier | $300–$700 |
| 20 mil reinforced liner | $700–$1,500+ |
| Vapor barrier tape | $30–$100 |
| Fasteners and accessories | $50–$200 |
| Safety equipment | $50–$150 |
Depending on crawl space size and material selection, most DIY installations cost between $300 and $1,500.
Professional Installation Costs
Hiring a professional generally includes:
- Site preparation
- Material installation
- Seam sealing
- Wall attachment
- Cleanup
- Workmanship warranty
Nationally, homeowners often pay between $1,500 and $4,500 for a professionally installed vapor barrier, although costs can be higher for large or difficult-to-access crawl spaces.
Projects that include drainage systems, dehumidifiers, or full encapsulation will cost more.
Factors That Affect Price
Several variables influence the total project cost:
- Crawl space size
- Material thickness
- Reinforced vs. standard polyethylene
- Ease of access
- Existing moisture problems
- Mold remediation requirements
- Drainage improvements
- Geographic location
- Labor rates
Obtaining multiple quotes from qualified contractors can help you compare pricing and services before making a decision.
Is DIY Worth It?
If your crawl space is dry, accessible, and free of major structural issues, a DIY installation can save a substantial amount on labor costs.
However, if the crawl space has standing water, mold, or significant moisture problems, hiring an experienced professional may provide better long-term value by ensuring the underlying issues are addressed correctly before the vapor barrier is installed.
When a Vapor Barrier Isn’t Enough
A crawl space vapor barrier is one of the most effective ways to reduce moisture coming from the soil—but it is not a solution for every crawl space problem.
Many homeowners install a vapor barrier expecting it to solve flooding, mold, or structural issues, only to find that the underlying problem remains.
The key is understanding what a vapor barrier can and cannot do.
A Vapor Barrier Controls Water Vapor—Not Liquid Water
A vapor barrier is designed to slow the movement of water vapor from the soil into the crawl space.
It does not:
- Stop flooding
- Pump out standing water
- Repair foundation cracks
- Eliminate plumbing leaks
- Dry saturated wood
- Remove existing mold
If these issues already exist, they should be corrected before or alongside the vapor barrier installation.
Signs You Need More Than a Vapor Barrier
A simple vapor barrier may not be enough if you notice any of the following:
- Standing water after rain
- Water stains on foundation walls
- Mold growing on framing
- Soft or rotting floor joists
- Rusted metal supports
- Persistent musty odors
- Indoor humidity above 60%
- Condensation on HVAC ducts
- Pest infestations
- Sagging or uneven floors
These symptoms usually indicate additional moisture sources that require a more comprehensive solution.
When Drainage Improvements Are Needed
If rainwater regularly enters your crawl space, installing plastic over the soil alone will not solve the problem.
Instead, you may first need:
- French drains
- Interior drainage channels
- Improved exterior grading
- Extended downspouts
- Gutter repairs
- Sump pump installation
Managing water before it reaches the crawl space is one of the most effective long-term moisture-control strategies.
When a Crawl Space Dehumidifier Is Recommended
Some crawl spaces remain humid even after a vapor barrier has been installed.
This often happens in:
- Humid climates
- Poorly ventilated crawl spaces
- Homes with air leaks
- Crawl spaces connected to conditioned living areas
A crawl space dehumidifier continuously removes excess moisture from the air, helping maintain humidity levels that discourage mold growth and wood decay.
Many encapsulated crawl spaces include a dedicated dehumidifier as part of the overall moisture-control system.
When Full Crawl Space Encapsulation Is the Better Choice
If your crawl space experiences ongoing moisture problems, full encapsulation may provide the most effective long-term solution.
Unlike a basic vapor barrier, encapsulation also includes:
- Sealed foundation walls
- Sealed crawl space vents
- Air leak sealing
- Wrapped support piers
- Heavy-duty reinforced liner
- Crawl space dehumidifier
- Optional drainage system
By controlling both ground moisture and humid outdoor air, encapsulation creates a cleaner, drier, and more stable environment beneath your home.
For homes with chronic humidity, mold, or recurring water intrusion, encapsulation often delivers better long-term protection than a vapor barrier alone.
Don’t Ignore Structural Problems
A vapor barrier should never be used to cover up structural damage.
If you observe:
- Rotting floor joists
- Cracked support beams
- Failing support piers
- Termite damage
- Foundation movement
consult a qualified professional before installing a vapor barrier.
Addressing structural issues early can prevent much more expensive repairs later.
How to Know Which Solution You Need
Every crawl space is different.
Some homes need nothing more than a properly installed vapor barrier.
Others require drainage improvements, dehumidification, or a complete encapsulation system.
The best approach depends on:
- The source of the moisture
- The severity of the problem
- The age of the home
- Your local climate
- Your long-term maintenance goals
Choosing the correct solution from the beginning often saves both money and frustration.
Still unsure what your crawl space needs?
Get a personalized severity score, likely causes, and recommended next steps based on the conditions you describe.
👉 Start Your Free Crawl Space Assessment
Frequently Asked Questions
Does every crawl space need a vapor barrier?
Not every crawl space requires one, but homes with exposed soil generally benefit from a properly installed vapor barrier because it helps reduce ground moisture, humidity, and the risk of mold and wood decay.
Can I install a vapor barrier myself?
Yes. Many homeowners successfully install vapor barriers themselves if the crawl space is dry, accessible, and free of major structural or water problems. However, professional installation may be a better option for difficult or high-moisture crawl spaces.
What thickness vapor barrier should I buy?
For most residential crawl spaces, 10 mil to 12 mil provides a good balance of durability and cost. For full encapsulation systems or crawl spaces with frequent maintenance access, 20 mil reinforced liners are often recommended.
Will a vapor barrier stop mold?
A vapor barrier helps reduce one of the primary causes of mold—ground moisture—but it will not eliminate existing mold or stop moisture from plumbing leaks, flooding, or high outdoor humidity.
How long does a crawl space vapor barrier last?
The lifespan depends on material quality, thickness, installation quality, and crawl space conditions. Premium reinforced liners installed correctly can last for many years, while thinner materials may require replacement sooner if damaged.
Is a vapor barrier the same as crawl space encapsulation?
No. A vapor barrier primarily covers the exposed soil, while encapsulation seals the entire crawl space—including walls, vents, and other openings—and usually includes a dehumidifier for comprehensive moisture control.
Conclusion
A crawl space vapor barrier is one of the simplest and most cost-effective ways to reduce ground moisture beneath your home. When properly installed, it can help lower humidity, protect structural wood, discourage mold growth, improve indoor air quality, and create a cleaner crawl space for future maintenance.
However, it’s important to recognize its limitations. A vapor barrier is not a cure-all for flooding, plumbing leaks, or severe moisture problems. In those situations, additional measures such as drainage improvements, dehumidification, or full crawl space encapsulation may be necessary.
By identifying the source of your crawl space moisture and selecting the right solution, you can protect your home’s foundation and avoid more costly repairs in the future.
Not Sure Which Solution Your Crawl Space Needs?
Whether you’re considering a basic vapor barrier or wondering if your home requires full encapsulation, the first step is understanding your crawl space’s current condition.
Our free assessment can help you:
- Evaluate your crawl space moisture risk
- Identify common warning signs
- Understand possible causes of your symptoms
- Learn whether a vapor barrier, encapsulation, drainage improvements, or professional evaluation may be appropriate